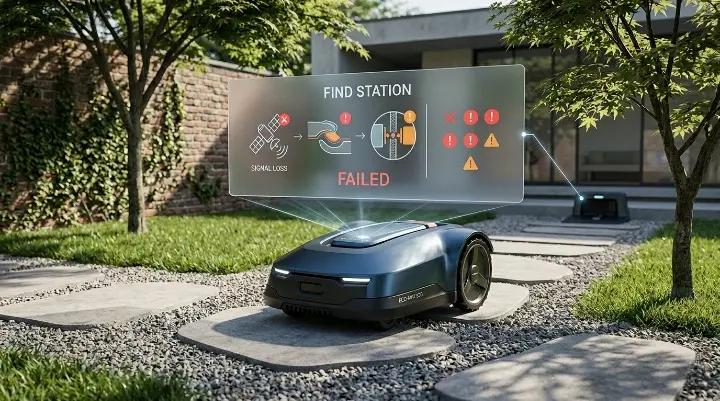
If your robot mower suddenly stops in the middle of the lawn or refuses to return to its charging station, it can feel like something is seriously wrong. In many cases, the mower may show a low battery warning, get stuck on the grass, or repeatedly search without success. This issue is more common than it seems and can happen even when the mower was working perfectly before.
The good news is that in most cases, the problem is not a broken machine, but a signal, wire, or setting issue that can be diagnosed step by step. Robot mowers rely on a few simple navigation systems to find their way back home, and when one of them fails or becomes weak, the mower can get confused.
In this guide, you will learn how robot mowers actually find their charging station, what can go wrong, and how to troubleshoot the most common causes in a clear and practical way.
How Robot Mowers Find Their Charging Station
Robot mowers don’t use GPS in the same way a car navigation system does. Instead, they rely on a combination of low-voltage signals in the garden and guidance logic built into the mower. Most systems, especially popular models like Husqvarna Automower and similar brands, use three main methods to locate the charging station.
1. Guide Wire (Primary Navigation Path)
The guide wire is the most important “return home” route. It runs from the charging station into the lawn and acts like a direct path the mower can follow when it needs to recharge.
When the system is working properly, the mower will:
- Search randomly in the lawn first
- Detect the guide wire signal
- Lock onto it and follow it directly back to the charging station
This is usually the fastest and most reliable way for the mower to return home.
However, if the guide wire is broken, poorly placed, or has weak signal, the mower may never enter “return mode” correctly and will keep wandering or switch to slower backup methods.
2. Boundary Wire (Backup Navigation Method)
The boundary wire defines the working area of the mower. It also serves as a backup route when the guide wire is not found.
If the mower cannot detect the guide wire, it will try to follow the boundary wire signal back toward the charging station.
This method is much less efficient because:
- The mower may need to travel a long distance around the garden edge
- It can take much longer to reach the charging station
- Complex garden shapes can confuse the routing path
In some setups, especially large or irregular lawns, relying on boundary wire can result in long return times or failed docking attempts.
3. Charging Station Signal (Final Docking Guidance)
As the mower gets close to the charging station, it switches from wire-based navigation to a short-range signal emitted by the station itself.
This signal typically works within a small radius (around 20–30 feet depending on model and conditions) and helps the mower:
- Locate the exact position of the charging station
- Align itself correctly for docking
- Adjust speed and angle for contact
If this signal is weak or blocked, the mower may reach the area but fail to dock properly, circling around the station without success.
Why This System Matters
These three systems work together like layers of backup. When everything is functioning correctly, the mower will almost always find its way home. But if even one layer is weak—such as a damaged guide wire or poor charging station signal—the mower may behave unpredictably, including getting stuck, wandering near the station, or failing to charge.
Understanding how these systems work is the first step in diagnosing why a robot mower cannot find its charging station.
Common Reasons Why a Robot Mower Cannot Find Its Charging Station
When your robot mower struggles to return to its charging station, there is usually a reason behind it. Understanding these common causes can help you quickly identify and fix the problem. Most issues fall into four main categories: guide wire problems, boundary wire interference, charging station signal issues, and sensor or hardware faults.
1. Guide Wire Issues
The guide wire is the primary path your mower uses to return home. If it is broken, damaged, or poorly installed, the mower may never find it. Common guide wire problems include:
- Broken or damaged wire: Underground shifts, gardening work, or lawn equipment can sometimes break the wire.
- Poor placement: Sharp turns, narrow corridors, or running too close to obstacles can confuse the mower.
- Connection issues: Loose connectors at the charging station or along the wire can weaken the signal.
Tip from real users: A Husqvarna 415X owner on Facebook found that setting the guide wire delay to 0 minutes solved the problem. Before adjusting settings, make sure the guide wire is intact and properly positioned.
2. Boundary Wire Interference
The boundary wire defines the mower’s working area, but it can also interfere with docking if placed too close to the charging station. The mower interprets the boundary wire as “do not cross,” so conflicting signals can prevent it from entering the dock.
- Keep the boundary wire slightly away from the station.
- Avoid loops that run directly underneath or alongside the dock.
Real-life experiences show that even a few inches of overlap can make the mower circle around the station endlessly.
3. Charging Station Signal Problems
Robot mowers rely on a short-range signal emitted by the charging station to guide precise docking. Problems can occur if the signal is weak or blocked.
Common causes include:
- Antenna damage or poor connection: On some models, the antenna is inside the station; on others, it’s a visible cable.
- Obstacles near the station: Grass, dirt, or objects can reduce signal strength.
- Incorrect signal settings: Some mowers allow adjusting the charging station signal range; too low a setting can prevent docking.
Users on Reddit and Facebook often report mowers reaching the station area but failing to dock—this is usually the first thing to check.
4. Sensor or Hardware Faults
Even if wires and signals are perfect, the mower may still fail to dock if its sensors or internal hardware are malfunctioning.
- Front or rear loop sensors: These detect signals from wires and the charging station. Dirt, moisture, or a damaged PCB can cause errors.
- Loose connectors or boards: Moving parts or past repairs may loosen connections.
- Software glitches: Firmware updates or resets may sometimes be required to restore normal operation.
Tip from the community: Replacing or resetting the front loop sensor often fixes repeated docking failures. Observing the mower while it tries to dock can reveal if it’s a sensor issue.
Summary
Most docking problems are caused by guide wire issues, boundary wire conflicts, weak charging station signals, or sensor faults. The good news is that these issues are usually easy to diagnose with a few simple checks and adjustments. By systematically checking wires, signals, and sensors, you can prevent your mower from getting stranded on the lawn.
Step-by-Step Troubleshooting Guide
When your robot mower struggles to find its charging station, following a systematic troubleshooting process is the fastest way to identify and fix the problem. In this guide, we start with the most common issues—wires and signals—and work our way through practical steps you can do yourself, even without prior experience.
Inspect and Test Guide Wire
The guide wire is the primary path your mower uses to return to the charging station. Problems here are the most common reason for failed returns, so it’s the best place to start.
Step 1: Visual Inspection
- Walk along the route of the guide wire.
- Look for any obvious damage such as cuts, kinks, or exposed wire.
- Check that connectors at the charging station are tight and corrosion-free.
Step 2: Test the Signal
Most robot mowers have a built-in test mode:
- Go to the mower’s menu → Installation → Find Charging Station → Test Guide.
- Place the mower near where the guide wire starts.
- Activate the test. The mower should detect the wire and follow it directly toward the charging station.
Step 3: Check the Guide Wire Delay Setting
- Many mowers wait a few minutes in “free search” mode before using the guide wire.
- Based on user reports, setting the guide wire delay to 0 minutes ensures the mower immediately prioritizes the guide wire when it needs to return.
- Example (Husqvarna Automower): Menu → Installation → Find Charging Station → Guide Wire Delay = 0 min.
Step 4: Repair or Replace if Needed
- If the mower fails the test, inspect the wire and connectors again.
- Repair small breaks with a waterproof splice kit.
- Replace damaged sections or connectors if necessary.
Tip: Always test the guide wire several times from different points in the lawn to ensure the signal is consistent.
Check Boundary Wire and Placement
The boundary wire defines the mower’s operating area, but if it’s too close to the charging station, it can create conflicts that prevent docking.
Step 1: Inspect for Damage
- Walk the perimeter and look for cuts, kinks, or exposed wire.
- Check that all boundary wire connections at the station are secure and clean.
Step 2: Check Placement Near Charging Station
- The boundary wire should not run directly under or immediately in front of the charging station.
- The mower may interpret the boundary signal as “do not enter,” conflicting with the charging station signal.
- If necessary, move the boundary wire slightly away from the docking area.
Step 3: Test the Mower
- After adjusting the boundary wire, place the mower near the station and run a docking test.
- Observe whether it successfully follows the guide wire and enters the station.
Step 4: Adjust Settings if Needed
- Some mowers allow you to increase the boundary wire delay, reducing the likelihood that the mower will follow the boundary wire before the guide wire.
- Example: Guide wire delay = 0 min, Boundary wire delay = 15–45 min (depending on lawn layout).
Tip: For complex garden layouts, it may be better to rely primarily on the guide wire and use the boundary wire only as a backup route.
Examine Charging Station Signal and Antenna
The charging station does more than just provide power. It also sends a short-range signal that helps the mower locate the docking position precisely. If this signal is weak or unstable, the mower may reach the station but fail to align correctly or keep “searching” in circles nearby.
Step 1: Check Power and Basic Operation
- Make sure the charging station is properly connected to power.
- Confirm the LED indicators show normal operation (not error or warning status).
- Inspect the transformer and power cable for visible damage.
Step 2: Inspect the Antenna System
- Many stations use a small antenna wire or internal signal loop.
- Look for loose, broken, or corroded connections.
- If the antenna wire is visible and damaged, it may need replacement or repair.
Step 3: Multimeter Testing (Basic Electrical Check)
If you have access to a multimeter, you can perform a simple continuity test:
- Disconnect power from the station.
- Test the antenna circuit or loop connections for continuity.
- A broken or inconsistent reading may indicate a damaged antenna or internal wiring issue.
Step 4: Adjust Signal Strength (If Available in Settings)
Some robot mower systems allow signal adjustments:
- If the signal is too weak → the mower may fail to detect the station early enough.
- If the signal is too strong → the mower may get confused about the exact docking position.
- Try adjusting the charging station signal level gradually and retesting docking behavior.
Tip: If the mower reaches the station but never aligns correctly, the issue is often signal-related rather than navigation-related.
Inspect Loop Sensor and PCBs
If wiring and signal systems are working properly, the issue may come from internal hardware inside the mower itself. Loop sensors and PCBs (printed circuit boards) are responsible for interpreting wire signals and guiding the mower’s navigation logic.
Step 1: Identify Common Symptoms
Loop sensor or PCB issues often show up as:
- Mower finds the charging station but behaves unpredictably near it
- Constant switching between “searching” and “approaching” modes
- Inconsistent docking even when wire signal is confirmed good
Step 2: Check Front and Rear Loop Sensors
- Many robot mowers use both front and rear sensors to detect loop signals.
- A faulty sensor may cause directional confusion near the charging station.
- Inspect connectors for looseness or moisture damage.
Step 3: PCB Inspection (Control Boards)
- The front PCB is often responsible for navigation input processing.
- The rear PCB may handle charging and docking communication.
- Common issues include corrosion, overheating, or damage from moisture ingress.
Step 4: Reset or Replace Components
- Try performing a factory reset or loop signal reset (if supported by your model).
- Re-pair or reinitialize the loop signal in the mower’s menu system.
- If the problem persists, replacing the faulty PCB or sensor module is often required.
Tip: Based on user reports, front loop sensor or PCB failure is one of the most common hardware-related causes of “cannot dock” behavior.
Adjust Robot Settings for Optimal Docking
Even when all hardware is working correctly, poor configuration can still cause inefficient or failed returns. Adjusting the search behavior settings can significantly improve docking reliability.
Step 1: Prioritize Guide Wire Navigation
- Set Guide Wire Delay = 0 minutes
- This ensures the mower immediately uses the guide wire when returning home
- Based on real-world user feedback, this single change often dramatically improves docking success
Step 2: Reduce Boundary Wire Priority
- Set Boundary Wire Delay = 15–45 minutes depending on garden size
- This prevents the mower from choosing the longer boundary route too early
- In most cases, boundary wire should only act as a backup option
Step 3: Adjust Corridor Width Settings
- Corridor width controls how much the mower shifts while following wires
- Too wide → mower may drift away from optimal path
- Too narrow → mower may get stuck or struggle in tight areas
- For narrow passages, reduce corridor width for more stable navigation
Step 4: Check Narrow Passage Behavior
- Ensure the mower can pass through tight areas without hesitation
- Observe how it behaves when entering and leaving corridors
- If it repeatedly loses signal in narrow spaces, adjust corridor width or reposition the guide wire
Tip: The best-performing setups usually rely heavily on the guide wire and minimize dependence on boundary wire navigation.
Preventive Tips to Ensure Your Robot Finds Its Charging Station
Most charging station problems are not sudden hardware failures—they usually build up over time due to wire placement, signal interference, or small setup issues that slowly affect navigation. The good news is that once the system is set up correctly, a robot mower is usually very reliable. A few simple preventive habits can significantly reduce the chance of docking issues.
Place the Guide Wire in a “High-Visibility” Path
The guide wire is the mower’s fastest route home, so its placement matters a lot. Ideally, it should run through a central, open path in your lawn where the mower has a high chance of crossing it during normal mowing.
Avoid:
- Tight corners or sharp 90° turns
- Running the wire too close to obstacles like trees or garden beds
- Placing it in narrow corridors where the mower can easily miss it
A well-positioned guide wire increases the chance that the mower finds it quickly, instead of relying on slower backup methods like the boundary wire.
Keep Charging Station Area Clean and Open
The area around the charging station should always be clear. Even small obstacles can interfere with docking accuracy or signal strength.
Make sure to:
- Remove grass buildup in front of the station
- Avoid placing objects within several feet of the dock
- Keep the ground level and stable (no sinking or tilting)
If the mower consistently struggles near the station, the issue is often physical alignment rather than electronics.
Avoid Signal Conflicts Near the Charging Station
One of the most overlooked issues is signal conflict between the boundary wire and the charging station signal. If the boundary wire runs too close to or under the charging station, the mower can receive mixed signals.
To prevent this:
- Keep boundary wire slightly away from the dock area
- Avoid overlapping loops directly beneath the charging base
- Test mower behavior after any wire adjustments
This helps ensure the mower doesn’t “see” conflicting instructions when trying to dock.
Use Proper Return Settings (Guide Priority)
Most robot mowers allow you to adjust how quickly they try different return methods. If the guide wire delay is too long, the mower may waste time searching randomly or using the boundary wire instead.
A more reliable setup is:
- Guide wire delay: low or 0 minutes (priority route)
- Boundary wire delay: longer delay as backup
- Charging station signal: leave at default or max strength
This setup ensures the mower always prioritizes the fastest and most reliable path home.
Regularly Inspect Wires and Connections
Even if everything works today, underground or surface wires can degrade over time due to weather, gardening tools, or pests.
A simple maintenance routine includes:
- Checking for visible wire damage every few weeks
- Testing guide wire response if behavior changes
- Re-seating connectors at the charging station if signal becomes unstable
Small issues caught early can prevent major navigation failures later.
Keep Firmware and Sensors in Good Condition
Modern robot mowers rely on internal sensors and software logic to interpret wire signals correctly. Dust, grass buildup, or outdated firmware can sometimes affect performance.
To maintain stability:
- Clean sensor areas periodically
- Update firmware if your model supports it
- Reset loop signal if navigation becomes inconsistent
These small steps help the mower interpret its environment more accurately.
When combined, these preventive tips significantly reduce the chances of a robot mower failing to find its charging station. Most issues can be avoided simply by ensuring clean wiring paths, strong signal separation, and correct return settings from the start.
Conclusion
A robot mower that struggles to find its charging station can be frustrating, but in most cases, the problem is not a broken machine. By understanding how the mower navigates—through guide wires, boundary wires, and charging station signals—you can diagnose the cause and apply practical fixes.
Preventive measures, such as proper guide wire placement, keeping the charging area clear, avoiding signal conflicts, and regularly inspecting wires and sensors, can keep your mower running smoothly for years. Adjusting the mower’s settings to prioritize the guide wire ensures it always takes the fastest route home. With these steps, even a complex garden setup can be managed without frequent docking issues.
Remember, the key is observation, testing, and small adjustments. Once the system is set up correctly, your mower should reliably return home and keep your lawn perfectly maintained.
Frequently Asked Questions
Why does my robot mower get close to the charging station but not dock?▼
This is often caused by a weak or blocked charging station signal, or misalignment with the docking contacts. Cleaning the area around the station and checking the signal or connectors usually solves the problem.
Can the boundary wire affect docking?▼
Yes. If the boundary wire runs under or too close to the charging station, it can send a conflicting signal that prevents proper docking. Keep boundary loops slightly away from the station area.
How do I know if the guide wire is working properly?▼
You can test the guide wire by using the mower’s “Find Charging Station” or “Test Guide” feature. If the mower fails to detect the wire, inspect for breaks or loose connections, especially near the charging station.
What should I do if my mower repeatedly shows a “No loop signal” error?▼
This usually indicates a loop sensor or PCB issue. Check the front and rear sensors, ensure connectors are secure, and consider replacement if the board is damaged.
How should I set the mower’s return settings?▼
Set the guide wire delay to 0 minutes so the mower prioritizes it as the main route home. Set the boundary wire delay longer (e.g., 15–45 minutes) as a backup. Keep the charging station signal at its default or maximum strength.
How can I prevent future charging station problems?▼
Regularly inspect wires and connectors, clean sensors, maintain a clear docking area, and periodically observe the mower’s return path to ensure it follows the intended route without obstacles.